Before i take any pics, i like to relax (stretch, deep breaths, whatever works for you) and take a moment to check that my hair, makeup, jewelry, hems, collars, etc. are where i want them to be. Once i've set the timer i can't fix anything fast enough to still get in the shot, so it just gets me flustered. Also, take multiple photos - once you're set up to take one picture, taking ten more in the same place and clothes will only add literally 2-3 minutes. And you're much more likely to get a picture you like that way.

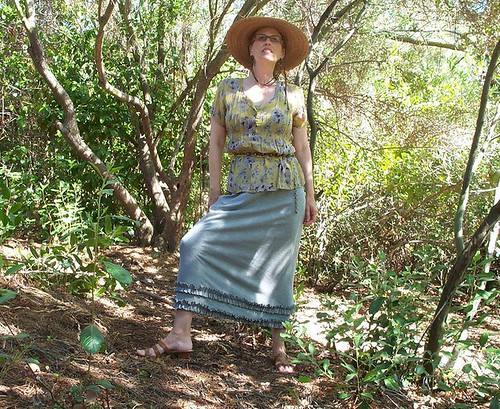
Turn your body about 30 degrees away from the image plane. Put your weight on the 'front' hip (the one closer to the camera) and bend the other knee. Put your far hand on your hip. This one is pretty easy and you see it a lot because it tends to flatter and shows the outfit pretty well. You can either look at the camera, or over your far shoulder. How far you 'stick out' your elbow and knee is personal preference. 'Bigger' gestures create an expansive, extroverted, excited mood, whereas smaller gestures feel more personal and intimate. It comes down to who you are, what you are wearing, the setting, the mood you want to create in that picture.


Some ways to vary this basic pose. Put your hand(s) on your hat, pat your hair, adjust your glasses, etc. Reach one hand out to fiddle with a prop (plant, chair, chiminea, flowers, etc.) Lean against a tree, doorjamb, chair, lamppost, football player, etc. Fiddle with some part of the front of your outfit - ruffles, zippers, buttons, ribbons, etc.
Reaching out from your body (with arms or legs) creates a wide visual reference against which other bodyparts (hips, breasts, etc.) will appear slimmer. Placing hands or knees towards the front of your body will make bust, tummy, etc. appear to recede in the picture space.

Now, some fancier poses.


'Side shots' can capture special details of particular outfits, provide a nice change of pace from the more standard 'front of the outfit' pictures, and provide a way to not look at the camera if you don't feel like it. Face so that the camera is straight out from your shoulder, then step forward (as you are facing)with the foot farthest from the camera. Transfer your weight to the foot you just stepped forward with. Now your torso should be slightly turned toward the camera, enough so that the main details of the 'front view' of your outfit will show in the picture. Lean forward, and let your non-weight-bearing foot trail in back of you.....look up, look down, look over your shoulder towards the camera - put your 'front hand' (closest to the camera) on your hip, waist, or down along your side (be careful to not let it get in front of any details you want to show).
In this shot, i'm leaning back (to look up) and holding the back hand up to my hat. Both of these moves help to de-emphasize the size of the bust in a side shot.


Leaning against a fence, bench, or chair allows you to bring one leg way up - here i did it to showcase the petticoat underneath the skirt. Even when you're not technically 'standing' you can keep your weight on one leg and reap the benefits of contrapposto. You can also see the big differences subtle changes make in a pose - in the second shot i just slouched a little, which brought the far arm behind my torso.


Finally, don't rule out sitting down altogether. Especially if you've shown the items of clothing before, or if you include detail shots, they can show off an outfit and make a nice visual change. There's plenty of benches in parks, on campuses, etc. that can make nice backdrops for your outfit photos. For these shots, i sat with the camera out to my side, then turned my torso to face the camera. Stretch one leg out longer than the other for visual interest.
One more technical concern: pay attention to the height of the camera to find your most flattering placement. I like mine around hip-height - much higher and i feel it over-emphasizes my bust. Remember, the closer an object is to the camera, the bigger it will look in the picture space. So experiment.
Now, it's time for you to practice! Practice in front of the mirror and in front of the camera, and evaluate what you like and what not so much. Do your best to figure out the 'why' behind your results. Look to other bloggers, ads, classic works of painting and sculpture, and magazines for ideas and inspiration. Even if you learn just one flattering pose to start, by using different outfits, hand and feet positions, and props you can vary it in numberless ways to keep things fresh. Posing is a skill and anyone can learn to do it. Have some fun - You Look Gorgeous!
These are very helpful, thanks so much for doing all of this work!
ReplyDeleteHi Ms. Pesu! thank YOU for stopping by! i'm glad you think these tips will be useful! steph
ReplyDeleteThank you thank you! As silly as it sounds, I have a very hard time "breaking down" the poses that I like. I'll remember one part and not really understand what the rest of my body was doing. So the next time I try that pose, only that one part looks right.
ReplyDeleteAnyway, that means that your step-by-step directions are *awesome* and I can't wait to try them out for my next outfit post! Thanks!!
Hi Kelly! i'm glad you're excited about this! i hope you read the comments to the other post on this topic - Sheila, queen of posing, says that she spent her fair share of time practicing in front of the mirror. and Cynthia finds she relies on her extensive belly dance training when posing....so practice and having an idea of what to look for are key.
ReplyDeletehave a great day!! steph
This is all so fascinating, and explains why I like the way I look in some of my photos but not others. I appreciate you taking the time to post all this. Very helpful!
ReplyDeletewelcome w.l.h.y.a.pear! thank you, i'm glad you find this helpful! i hadn't been by your blog before, it was a nice treat and i look forward to more - and you sure can jump!! whew! steph
ReplyDelete