Showing posts with label photography tips. Show all posts
Wednesday, October 13, 2010
T. Rex On Location
i was never in any danger - these are casts of a Tyrannosaurs rex skeleton, not the actual fossil bones.
Well, these shots happened on the spur of the moment. Mr. E was invited to a pre-game get together with 'the guys' in the Bear's Lair at UC Berkeley Saturday morning (they were playing UCLA, apparently that's a big deal). I found out about 7:30, 8:00pm the night before.....so i was going to have a couple of hours to wander around campus in the morning. (I'd wanted to go to Jay Schaeffer's Tiny Open House up in Sebastapol that day. But Jay's having open houses every month now, and we'd seen his previous tiny house already. 'Beers with the boys' won out.)
I knew immediately i'd go try to get some shots of myself with the Tyrannosaurus rex mount in the atrium at the new Life Sciences building. Why that? Here's a favorite picture of myself, at around age twenty one, on the windowsill next to my bedside:
I'm at the old Academy of Sciences in Golden Gate Park, standing in front of an Allosaurus mount. I'd been interested in dinosaurs since i was around three. When we moved from Fresno to the Bay Area (i was in kindergarten), mom got us excited about the move by touting all the dino mounts they had at UC Berkeley. I've always had a fascination with ancient times, geology and natural sciences, different animals and plants. I'm known for that fascination, and for being able to spell 'paleontology' at the age of four. (That's my brother's varsity jacket - i am not known for any athletic ability whatsoever!)
blooper - this lady was very nice about it. i told her don't worry, those memory cards are huge.
I've carried around that picture for years, and it's almost become a sort of totem. So there's no way i'd pass up the chance to get a pic with the even more ferocious T. rex. The only problem - it's in a public place, and i was going to take the picture on a very busy day in that spot. Well, as it turns out i've been doing enough self-pictures at home and on location that i felt confident about getting some decent shots. And i did! Even a few months ago i don't think i would've been able to pull this off. So i thought i'd share the little that i've learned about shooting yourself on location with you.
First, practice at home as much as possible! The more you are familiar with your camera, posing, what lite conditions work best for you, how high you like the camera to be and how far away you like it to be, the more relaxed you will be when on location. You'll have enough new variables to keep you occupied without creating more for yourself to cope with. I like to use my body as a 'measuring stick' - i know that i like the camera at about hip height, and about 5 paces away when the camera is on end. If you know these 'measurements' you can scope out locations whenever you run across them. This information is especially important if you don't have a tripod and need to find a shelf, bench, etc. to hold your camera for the shoot.
blooper - framing can be a pain with no tripod and no one to look thru the viewfinder. review your pics frequently and take lots of shots.
If you feel at all nervous or ill at ease about photographing yourself 'in public', come up with 'your story' beforehand. Just a sentence will do - frankly most people couldn't care less and will be most concerned with not blocking your shot. But knowing how you will handle inquiries will make you less feel flustered so you can concentrate better. 99% of the time, my conversations go like this: them: 'So why are you taking a picture of yourself in front of a T. rex?' me: 'oh, i wanted to take a picture of myself in front of a T. rex.' them: 'oh. Wow! Great.' Especially if you're in an even remotely tourist-y location, people don't care. Everyone who's noticed me has been really nice and considerate. So don't worry about it - hop on in if you want!
Make Sure Your Camera Is Visible. You don't want it to get trampled or knocked off a ledge! Set a big bag, sweater, or a stack of books next to it so people won't sit or step on it. Even if you use a tripod, the equipment is so small today that it's easy to miss, especially in a busy public space where most people are pretty distracted. Also, pay attention to where you place your camera. You don't want it falling into a scummy pond or trashbin. Gusts of wind can take out a tiny camera. Taking a minute to tie your camera to a pole or bench could help avoid disaster.
blooper - a tour of prospective students came through. i waited 'em out.
Consider the Time Of Day. Do you want to have a lot of people in your shot, or have to deal with shooting 'around' them? What are the 'busy' times in the location you're considering? What is the lighting situation? If there are a lot of tall trees or buildings in the area, you could have large areas in deep shadow by mid-afternoon (which can be hard to shoot around). If you are inside, is there a lot of natural light or is it largely incandescent or flourescent? If you don't like how these lights look in photos, do you know how to use a filter to counteract the effect, or how to photoshop it away? (I don't!)
Also, certain locations (museums, stadiums, theatres) will be swamped with people on some days of the week and deserted on others. You might want to check schedules for any special events as well. Events with a lot of people in costume or decorations can offer great photo opportunities.
a decent shot! persistence pays off.
Give Yourself Plenty of Time. I was hanging around that dinosaur for about 45 minutes or an hour. Take a book or your iPod. You'll want to take even more shots than usual because of all the potential bloopers. And you don't want to be a pest - three boys were there with two of the boys' father, and they had a fantastic time taking pics and playing around that dinosaur before going to see the Big Football Game. They even spotted some UCLA fans!!!! I just hung out and read while they had a blast. It's a public place, everyone should be able to enjoy it.
You'll also want to spend some time checking out the area for interesting angles and details you may not have noticed that could add to your photos. Wander around, up and down, crouch down, look up stairways and down from landings or balconies. Look through the viewfinder to see how the camera will capture the same space from different angles. I've always loved this Pteranodon mount, but have never had any luck with photographing it - all those rails overwhelm the delicate bone structure.
spot the pteranodon - if you can.
But after 40 minutes of sitting and wandering around, i noticed:
Holy Cats! there's a dinosaur flying through the Life Sciences building!
These shots aren't perfect, but they give a much better feel of the excitement of being right next to this long dead, flying creature in the building's atrium. Many locations have an 'obvious' angle from which they are photographed. Often, that angle has become popular because it's recognizable and makes for a pleasing composition. But if you can find another angle or take on a familiar spot, the photograph becomes more your own.
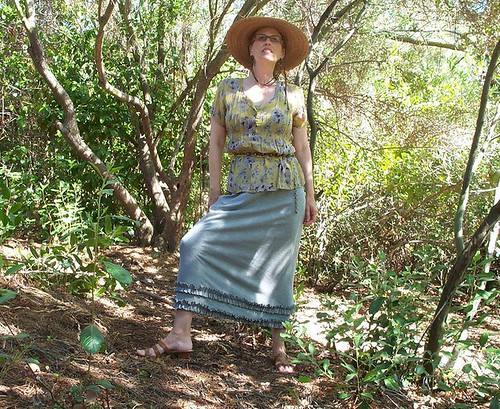
Finally, What To Wear. That's a whole book in itself, so i'll just mention a couple of ideas. The basic question is do you want to blend in or harmonize with the environment, or do you want to create a dramatic contrast between yourself and the background location? Do you want to create an association between your outfit and the location (wearing a Victorian-style blouse in front of a Victorian-era house, leopard print blouse at the big cat enclosure in the zoo, etc.). I'd already settled on this outfit before i knew i'd be at UCB. But i do like the bright blue against the yellow tones of the T. rex, and the prim, ladylike feel of the outfit against the savage, rugged bones and teeth.
I love shooting on location - there are so many amazing places out there and the creative opportunities are unbelievable. You are putting yourself on display, though......but if the creative side of you wants to explore this type of photography, it's completely worth doing. Just prepare as best you can beforehand, and be flexible when you get there. If anyone asks what you're up to, just brazen it out. It's a blast!
Dress: own design, inspired by Work With What You Got
Petticoat: own design, inspired by Alisa Burke
Shoes: Clark's Passion
Hat: ??? from the Berkeley Hat Company
Stockings: ??? from The Dark Garden
Earrings: liliswan on etsy
Scarf: wedding gift
Wednesday, October 6, 2010
Photo Posing for Curvier Ladies, Part the Second
Okay! I'm going to show you a bunch of poses, generally going from simpler to a little fancier, with notes on how to 'get in' to them and why they work.
Before i take any pics, i like to relax (stretch, deep breaths, whatever works for you) and take a moment to check that my hair, makeup, jewelry, hems, collars, etc. are where i want them to be. Once i've set the timer i can't fix anything fast enough to still get in the shot, so it just gets me flustered. Also, take multiple photos - once you're set up to take one picture, taking ten more in the same place and clothes will only add literally 2-3 minutes. And you're much more likely to get a picture you like that way.
Turn your body about 30 degrees away from the image plane. Put your weight on the 'front' hip (the one closer to the camera) and bend the other knee. Put your far hand on your hip. This one is pretty easy and you see it a lot because it tends to flatter and shows the outfit pretty well. You can either look at the camera, or over your far shoulder. How far you 'stick out' your elbow and knee is personal preference. 'Bigger' gestures create an expansive, extroverted, excited mood, whereas smaller gestures feel more personal and intimate. It comes down to who you are, what you are wearing, the setting, the mood you want to create in that picture.
Oh, i'd just come back from a hot, nighttime walk and was i sweating! The same pose, but with the bent knee and hand on hip to the front of the picture. I'm also leaning back a little, as opposed to standing straight up in the first pic. Even small changes like these (bent limbs to the front, a little slouch) can create a feeling of more movement in the pose.
In this pose i'm positioned almost head-on at (shoulders and hips parallel to) the image plane. I've brought the bent knee forward, in front of the other knee. This creates a curvy outline to the figure, and is also good for showing off details on the top of a shoe.
Some ways to vary this basic pose. Put your hand(s) on your hat, pat your hair, adjust your glasses, etc. Reach one hand out to fiddle with a prop (plant, chair, chiminea, flowers, etc.) Lean against a tree, doorjamb, chair, lamppost, football player, etc. Fiddle with some part of the front of your outfit - ruffles, zippers, buttons, ribbons, etc.
Reaching out from your body (with arms or legs) creates a wide visual reference against which other bodyparts (hips, breasts, etc.) will appear slimmer. Placing hands or knees towards the front of your body will make bust, tummy, etc. appear to recede in the picture space.
Here the front leg carries the weight, with the non-weight-bearing leg extended to the back instead of the side. My bust looks more prominent, but i like the sense of motion, and my arms out to the side help balance the size of the bust. You could do this pose and lift the front hand (the one on the same side as the weight-bearing leg) up to your collar or hair to further de-emphasize the bust or tummy.
Now, some fancier poses.
This one works nicely on a hill, next to steps, etc. Face the camera face-on, put the weight on the hip over the lower foot, then place the other foot up the hill, on the step or pile of books, etc. forward of the other foot (closer to the camera's image plane). Go for it and place your feet wider apart than your hips. Since you're not at an angle to the image plane, you may want to try exaggerating the slant of your shoulders. Not for the faint of heart - try this one on a day when you're feeling your cojones.
Poses for showing off twirly skirts. Keep all of your weight on the back foot, and turn almost perpendicular to the camera's image plane (so the camera is facing your shoulder). Stretch your non-weight-bearing foot toward the camera, and turn your upper body to face the camera. Put your hands on your hips, one hand on hip, both on hat -whatever you want......lean away from the camera.......when there is less than a second to go, wiggle your front hip from side to side to make your skirt shimmy. Stop wiggling right before the camera clicks, so only the skirt is in motion. Take a bunch of shots of this pose so you can pick the best one.
'Side shots' can capture special details of particular outfits, provide a nice change of pace from the more standard 'front of the outfit' pictures, and provide a way to not look at the camera if you don't feel like it. Face so that the camera is straight out from your shoulder, then step forward (as you are facing)with the foot farthest from the camera. Transfer your weight to the foot you just stepped forward with. Now your torso should be slightly turned toward the camera, enough so that the main details of the 'front view' of your outfit will show in the picture. Lean forward, and let your non-weight-bearing foot trail in back of you.....look up, look down, look over your shoulder towards the camera - put your 'front hand' (closest to the camera) on your hip, waist, or down along your side (be careful to not let it get in front of any details you want to show).
In this shot, i'm leaning back (to look up) and holding the back hand up to my hat. Both of these moves help to de-emphasize the size of the bust in a side shot.
Set up your camera, get the timer going, and start walking towards the camera a second or two before it 'clicks'. Your body obeys 'the laws of contrapposto' naturally as you move, and especially while walking. Again, take a bunch of shots. You can put a hand on hip, adjust your glasses, trail a scarf or hat to add interest or emotion. You can look to the side, a little or a lot, to vary the mood. Walking shots taken from the side are classic for portraying motion and drama - especially for ladies with long hair or wearing floaty garments. Just start walking parallel to the image plane a second or so before the timer goes off. Look over the shoulder closest to the camera, behind you, to give the sense of being chased.
Leaning against a fence, bench, or chair allows you to bring one leg way up - here i did it to showcase the petticoat underneath the skirt. Even when you're not technically 'standing' you can keep your weight on one leg and reap the benefits of contrapposto. You can also see the big differences subtle changes make in a pose - in the second shot i just slouched a little, which brought the far arm behind my torso.
Finally, don't rule out sitting down altogether. Especially if you've shown the items of clothing before, or if you include detail shots, they can show off an outfit and make a nice visual change. There's plenty of benches in parks, on campuses, etc. that can make nice backdrops for your outfit photos. For these shots, i sat with the camera out to my side, then turned my torso to face the camera. Stretch one leg out longer than the other for visual interest.
One more technical concern: pay attention to the height of the camera to find your most flattering placement. I like mine around hip-height - much higher and i feel it over-emphasizes my bust. Remember, the closer an object is to the camera, the bigger it will look in the picture space. So experiment.
Now, it's time for you to practice! Practice in front of the mirror and in front of the camera, and evaluate what you like and what not so much. Do your best to figure out the 'why' behind your results. Look to other bloggers, ads, classic works of painting and sculpture, and magazines for ideas and inspiration. Even if you learn just one flattering pose to start, by using different outfits, hand and feet positions, and props you can vary it in numberless ways to keep things fresh. Posing is a skill and anyone can learn to do it. Have some fun - You Look Gorgeous!
Tuesday, October 5, 2010
Contrapposto: Photo Posing for Curvier Ladies
From Wikipedia: "Contrapposto is an Italian term used in the visual arts to describe a human figure standing with most of its weight on one foot so that its shoulders and arms twist off-axis from the hips and legs. This gives the figure a more dynamic, or alternatively relaxed appearance."
Today i'm starting a couple of posts on what i've learned in terms of posing to end up with more flattering and attractive outfit photographs. The information will likely appeal more to daily outfit bloggers, but anyone with a curvier figure can use this information to look better in any type of photo (party, family reunion, documenting the kitchen remodel, etc.) My inspiration to do these posts bubbled over when i read Kelly's thoughts over at her blog Proficiscamur! about how frustrated she is with how her outfit photos look. They don't reflect how the clothes look in real life and it's just depressing to have a great outfit, snap a pic, then have this so-so photo to show for it. Again, thinking only of my selfish desires (Kelly is so adorable looking and wears such cute outfits - don't give up!), i thought it was time to give it a go and set down what i've learned thus far about posing. This first post will concentrate on some ideas and concepts which help me understand which poses work and which don't - both in my own and in other's photos. These can be a little tricky to wrap your brain around to begin with, but these concepts have really helped me improve my posing much more quickly (instead of going hit or miss with no idea of why things work or don't). The next post will show a bunch of poses you can try, and how to do them.
First, i'm not using 'curvy' to mean 'fat but nicer'. I'm talking about ladies who have a rounder shape overall or in certain parts - big tits, junk in the trunk, some belly, saddlebags. I'm also just going to address how you pose or position your body in relation to the camera in these posts - nothing about clothes, makeup, hair. Curvy figures often look great on video or film, but a still photo needs special attention to flatter curves. Think about it - it's a box with a flat piece in the back, the antithesis of what you're trying to capture. But with a little help from concepts in photography and art practice, you can pose in order to highlight your figure and portray it more accurately on flat film.
(If you don't have time to wade through all this, just go over to Sheila's Blog Ephemera and copy her poses. She's a past master at flattering, visually exciting poses. Also notice she's been at it a while, and has had a lot of exposure to art and art training. Which means if you put in the effort you can become a master too!)
To begin, it helps to understand a little bit about the structure of the camera. Specifically, the plane of the photograph or the image plane. This is the surface on which the image is captured (the film in the olden days). You can hold a flat piece of cardboard flat against the back of your camera in order to help you visualize this plane. When modeling, you always want to think about the relationship of your body to that plane.
One way to help yourself get the idea is to position your camera in a room with it's back flush to one wall. That wall is the image plane. If you stand with your shoulders and hips equally distant from the opposite wall, you are parallel to the image plane. You can turn your body at various angles to the image plane and get a good idea of the relationship by seeing how you are positioned in relation to the walls of the room. This matters (and is worth practicing to get the hang of ) because some angles are flattering and some are not. The same pose will look great when photographed from one angle and lousy from another. Also, objects that are closer to this plane will appear more prominent in the resulting photograph than other objects which are farther away. Examine the location(s) where you often take pictures for existing parallel lines to help you visualize this relationship in your environment (streets, lines in sidewalks, buildings, fences, and so on).
So where does contrapposto fit into all of this? Basically, it's what your body does when you put your weight on one leg. It was developed back in ancient Greece to make sculptures look more lifelike, attractive, and visually compelling. It does the same stuff these days. When you put your weight on one leg, that side of your hips rises in height while the other side falls. The 'weight-bearing' side of your shoulders falls while the other side rises. As a result, both your hips and shoulders will look slimmer when viewed head on. But, as it happens, this posture also tends to 'twist' the angle of shoulders and hips away from 'flat' - the weight-bearing hip shifts toward the front of the body, the other hip falls back a little.....and the shoulders do the opposite. This also makes hips and shoulders/chest look slimmer in a photo.
Examine poses you like, and ones you don't, with contrapposto in mind. How are the model's hips and shoulders positioned? Are they confronting the image plane head on, or are they turned at an angle? Is it a little angle or a big one?This type of analysis can help you duplicate poses you like.
A couple more ideas. Objects closer to the camera will appear bigger than ones farther away. Also, the eye judges the size of objects in a photo by comparing their size to that of other objects in the same photo. Put a Great Dane in a photo with an elephant, and the big dog looks smaller. Put these two rules together and you can change how your figure comes across in photos. Big bust? Instead of facing the camera head-on, turn so that one shoulder is closer to the camera than the other....your 'leading' shoulder is now closer to the camera than your bust, making your bust appear less prominent. Wide hips? Put your weight on one hip and your hands on your waist, elbows sticking out....your arms make a bigger shape than your hips, slimming them visually. I'll be talking about this a lot in the next post with photos.
I hope this helps and is kind of understandable. As always, please ask if any of it is confusing or you have any questions. Any ideas or tricks you've found helpful would be great to put in the comments, too!!!
with contrapposto
Today i'm starting a couple of posts on what i've learned in terms of posing to end up with more flattering and attractive outfit photographs. The information will likely appeal more to daily outfit bloggers, but anyone with a curvier figure can use this information to look better in any type of photo (party, family reunion, documenting the kitchen remodel, etc.) My inspiration to do these posts bubbled over when i read Kelly's thoughts over at her blog Proficiscamur! about how frustrated she is with how her outfit photos look. They don't reflect how the clothes look in real life and it's just depressing to have a great outfit, snap a pic, then have this so-so photo to show for it. Again, thinking only of my selfish desires (Kelly is so adorable looking and wears such cute outfits - don't give up!), i thought it was time to give it a go and set down what i've learned thus far about posing. This first post will concentrate on some ideas and concepts which help me understand which poses work and which don't - both in my own and in other's photos. These can be a little tricky to wrap your brain around to begin with, but these concepts have really helped me improve my posing much more quickly (instead of going hit or miss with no idea of why things work or don't). The next post will show a bunch of poses you can try, and how to do them.
not much contrapposto
First, i'm not using 'curvy' to mean 'fat but nicer'. I'm talking about ladies who have a rounder shape overall or in certain parts - big tits, junk in the trunk, some belly, saddlebags. I'm also just going to address how you pose or position your body in relation to the camera in these posts - nothing about clothes, makeup, hair. Curvy figures often look great on video or film, but a still photo needs special attention to flatter curves. Think about it - it's a box with a flat piece in the back, the antithesis of what you're trying to capture. But with a little help from concepts in photography and art practice, you can pose in order to highlight your figure and portray it more accurately on flat film.
(If you don't have time to wade through all this, just go over to Sheila's Blog Ephemera and copy her poses. She's a past master at flattering, visually exciting poses. Also notice she's been at it a while, and has had a lot of exposure to art and art training. Which means if you put in the effort you can become a master too!)
assets front and center
To begin, it helps to understand a little bit about the structure of the camera. Specifically, the plane of the photograph or the image plane. This is the surface on which the image is captured (the film in the olden days). You can hold a flat piece of cardboard flat against the back of your camera in order to help you visualize this plane. When modeling, you always want to think about the relationship of your body to that plane.
One way to help yourself get the idea is to position your camera in a room with it's back flush to one wall. That wall is the image plane. If you stand with your shoulders and hips equally distant from the opposite wall, you are parallel to the image plane. You can turn your body at various angles to the image plane and get a good idea of the relationship by seeing how you are positioned in relation to the walls of the room. This matters (and is worth practicing to get the hang of ) because some angles are flattering and some are not. The same pose will look great when photographed from one angle and lousy from another. Also, objects that are closer to this plane will appear more prominent in the resulting photograph than other objects which are farther away. Examine the location(s) where you often take pictures for existing parallel lines to help you visualize this relationship in your environment (streets, lines in sidewalks, buildings, fences, and so on).
contrapposto - focus on the outfit, not what rhymes with 'fits'
So where does contrapposto fit into all of this? Basically, it's what your body does when you put your weight on one leg. It was developed back in ancient Greece to make sculptures look more lifelike, attractive, and visually compelling. It does the same stuff these days. When you put your weight on one leg, that side of your hips rises in height while the other side falls. The 'weight-bearing' side of your shoulders falls while the other side rises. As a result, both your hips and shoulders will look slimmer when viewed head on. But, as it happens, this posture also tends to 'twist' the angle of shoulders and hips away from 'flat' - the weight-bearing hip shifts toward the front of the body, the other hip falls back a little.....and the shoulders do the opposite. This also makes hips and shoulders/chest look slimmer in a photo.
Examine poses you like, and ones you don't, with contrapposto in mind. How are the model's hips and shoulders positioned? Are they confronting the image plane head on, or are they turned at an angle? Is it a little angle or a big one?This type of analysis can help you duplicate poses you like.
bring one knee forward (closer to the camera) to make a large bust or tummy less prominent
A couple more ideas. Objects closer to the camera will appear bigger than ones farther away. Also, the eye judges the size of objects in a photo by comparing their size to that of other objects in the same photo. Put a Great Dane in a photo with an elephant, and the big dog looks smaller. Put these two rules together and you can change how your figure comes across in photos. Big bust? Instead of facing the camera head-on, turn so that one shoulder is closer to the camera than the other....your 'leading' shoulder is now closer to the camera than your bust, making your bust appear less prominent. Wide hips? Put your weight on one hip and your hands on your waist, elbows sticking out....your arms make a bigger shape than your hips, slimming them visually. I'll be talking about this a lot in the next post with photos.
I hope this helps and is kind of understandable. As always, please ask if any of it is confusing or you have any questions. Any ideas or tricks you've found helpful would be great to put in the comments, too!!!
Subscribe to:
Comments (Atom)
